Jake, that's great!
-Ben
DIY thread
Re: DIY thread
"The place looked like a washing machine full of Josh's carharts. I was not into it." --Sockmonkey

Re: DIY thread
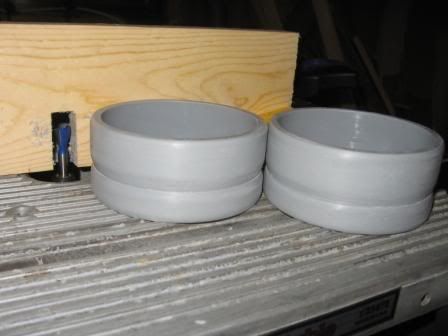
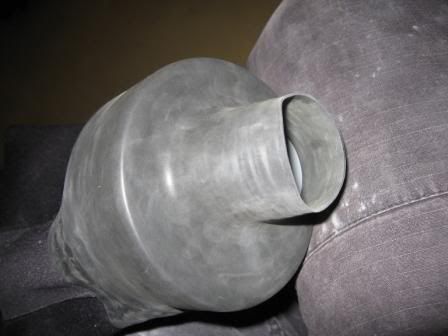
Here is my latest DIY. Since nobody wanted to sell me one at a reasonable price I decided to do my own STA. After looking at all the stuff out there this is what I came up with.
$15 bucks including bolts and about an hours work. 4 X 1.25 aluminum channel with the legs cut down 3/4" and angled at 30 degrees. Can be done on any 10" table saw with a carbide blade. Fits a 7 1/4" tank perfect and adds about 2 1/2 lbs to your rig. Solid as a rock and an easy DIY that anyone can do and saved me anywhere from 50 to 80 bucks!


$15 bucks including bolts and about an hours work. 4 X 1.25 aluminum channel with the legs cut down 3/4" and angled at 30 degrees. Can be done on any 10" table saw with a carbide blade. Fits a 7 1/4" tank perfect and adds about 2 1/2 lbs to your rig. Solid as a rock and an easy DIY that anyone can do and saved me anywhere from 50 to 80 bucks!
http://dustys-lights.com/, An awesome light at an unbelievably low price
Dusty's Lights on facebook
http://underthesound.smugmug.com/
Dusty's Lights on facebook
http://underthesound.smugmug.com/

Re: DIY thread
So you are just sandwiching in your cam strap between backplate and STA? (I notice no cam strap holes)
Dusty2 wrote:Here is my latest DIY. Since nobody wanted to sell me one at a reasonable price I decided to do my own STA. After looking at all the stuff out there this is what I came up with.
$15 bucks including bolts and about an hours work. 4 X 1.25 aluminum channel with the legs cut down 3/4" and angled at 30 degrees. Can be done on any 10" table saw with a carbide blade. Fits a 7 1/4" tank perfect and adds about 2 1/2 lbs to your rig. Solid as a rock and an easy DIY that anyone can do and saved me anywhere from 50 to 80 bucks!
----
"I survived the Brittandrea Dorikulla, where's my T-shirt!"
"I survived the Brittandrea Dorikulla, where's my T-shirt!"
Re: DIY thread
Milling in slots would take it out of the home DIY realm and you would also have to cut a reilief in th legs to create clearence between the tank and the legs for the straps. There is no need for slots. You could sandwitch them if you desire but you can still use the normal slots in the backplate without the need for that. Remember KISS? Here are some pixljjames wrote:So you are just sandwiching in your cam strap between backplate and STA? (I notice no cam strap holes)


http://dustys-lights.com/, An awesome light at an unbelievably low price
Dusty's Lights on facebook
http://underthesound.smugmug.com/
Dusty's Lights on facebook
http://underthesound.smugmug.com/

Re: DIY thread
Looks good Dusty! I understand where laura's coming from, threading the cam band like that makes it less convenient to switch between singles and doubles, but if you're just diving a single tank all the time, attaching the camband to the STA isn't really necessary. It depends on if your wing has holes for threading the camband, and where they are.
Still a really cheap solution that should be pretty solid.
Jake
Still a really cheap solution that should be pretty solid.
Jake
Re: DIY thread
Especially if you have the MC storage pack (or some other backplate cover on it)
----
"I survived the Brittandrea Dorikulla, where's my T-shirt!"
"I survived the Brittandrea Dorikulla, where's my T-shirt!"
Re: DIY thread
I do indeed but I won't get into that end of it cause the DIR guys would faint if they saw my rig. That is why I said you could do it either way. Sandwiching the bands between would work just fine and would allow for easy switch to doubles.ljjames wrote:Especially if you have the MC storage pack (or some other backplate cover on it)
For me thats not a factor however because I don't plan on going the doubles route any time soon. Just my HP100 and a 30cu pony. No one I dive with has doubles and I'm not into deep diving. For me it's all about pictures of the pretties and they run out at less than 90 feet max. I average upwards of 70 min and have done more than 90 several times without touching the pony. By then I'm getting cold anyway and most of my dive buddies can't last that long.
http://dustys-lights.com/, An awesome light at an unbelievably low price
Dusty's Lights on facebook
http://underthesound.smugmug.com/
Dusty's Lights on facebook
http://underthesound.smugmug.com/
Re: DIY thread
I look at it this way: Dusty's setup is mechanically equivalent to Tobin's DSS singles rig but instead of the rubber blocks he is using the aluminum channel. Running the cam-bands through the plate (like a DSS singles rig) makes the whole thing very secure as well as more stable. The only real difference is Dusty's channel is bolted to the plate whereas the DSS blocks free float until sandwiched. If you only dive singles it looks very effective.
-Ben
-Ben
"The place looked like a washing machine full of Josh's carharts. I was not into it." --Sockmonkey
Re: DIY thread
I do believe this thread has been dead too long.
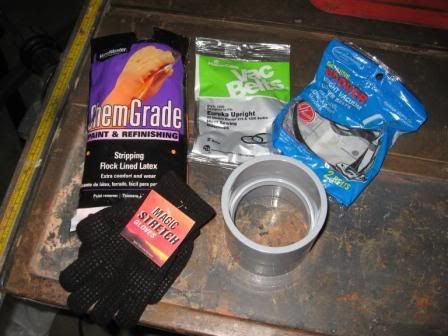
My wetgloves have been slowly deteriorating, and are no longer keeping my hands as warm as they once were. Since I'm rocking my sweet NeoZ drysuit, I figured why not make some drygloves? Total cost was about $20. I may spend a little more and upgrade my liners, my hands got a little cold tonight, but the were dry!
DIY Dry Gloves and Rings.
DIY Dry gloves and ring are a fairly easy DIY project, requiring fairly few tools.
Step 1 – Acquire the necessary parts:
- 3” PVC coupling
- 4” diameter vacuum cleaner belts
- Rubber or Vinyl gloves
- Glove liners
- Contact cement
Step 2 – Mark the 3” PVC coupling and cut it in half. I used a 10” chop saw, but it could be done by hand if you’re careful.
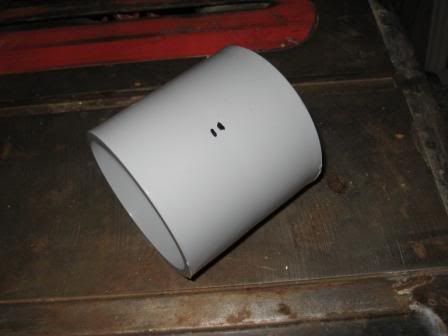
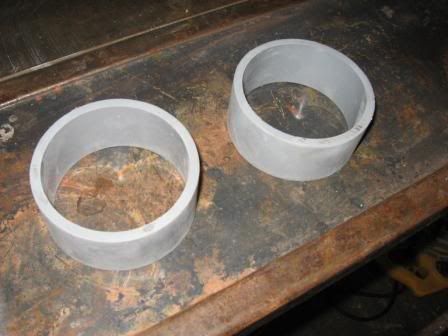
Step 3 – I used a router to cut a grove, closer to one end. This will be where the vacuum cleaner belt will sit to hold everything together. This step can be done with a dremmel or just a file. I then sanded both pieces thoroughly to make sure that all surfaces were smooth so that nothing will snag on the latex seals on the suit.
Step 4 – Prepare the gloves. The inner surface of the gloves I bought was lined with some sort of fabric. Since this probably wouldn’t seal very well, I folded the gloves back on themselves, and applied a line of contact cement at the fold, and at the edge. Then fold the two together, to have the outside folded in permanently.
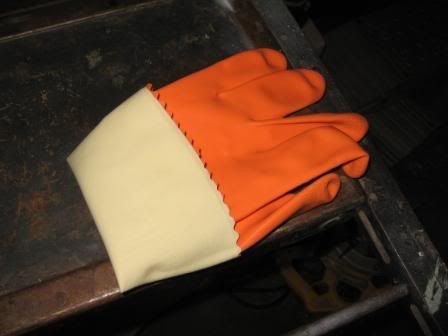
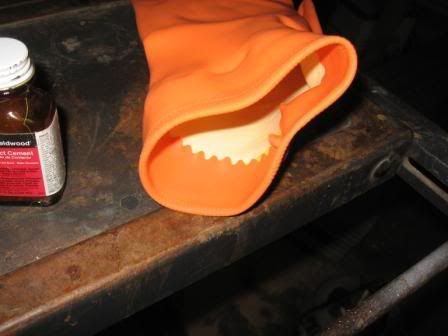
It’s a good idea at this point to make sure that every thing goes together. I assembled the gloves on the rings to make sure everything fits. Slide the glove over the ring, then slide the vacuum cleaner belt over the top to hold it in place.
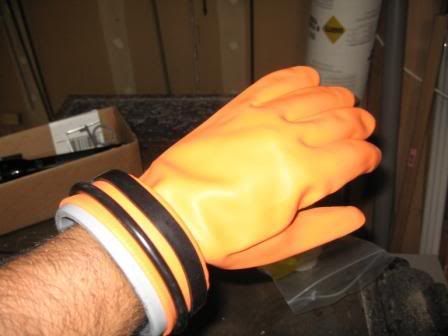
Step 5 – Place the ring in the suit. The directions I was working from recommended going from inside the suit with the ring, but I found if worked better to just use a lot of talc and work the rings in from the open end. Make sure the end with the grove goes in towards the suit. I left mine so that the seal is still in place around my wrist. This way if the gloves leak the suit won’t flood.
Step 6 - Stretch the glove over the ring and latex seal. Then stretch the vacuum cleaner belts over the top of the gloves. You’re now ready to dive. Don the liner first, and put on the suit.
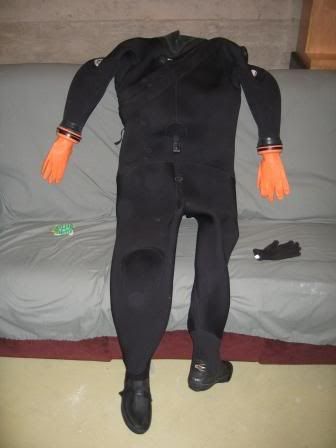
Step 7 – Go diving! Enjoy dexterity and dry hands!
I did wind up swapping out the awesome orange kitchen gloves that I originally tried, since they didn't have much room in them for thicker insulation, but even those kept me dry for the dive I did in them. I used exactly the same procedure and switched out to Smurf gloves. Right now the only thing I don't like is having them always attached to the suit makes dealing with my neck seal a PITA.
Tonights dive was 40 minutes, dry hands!
Jake
My wetgloves have been slowly deteriorating, and are no longer keeping my hands as warm as they once were. Since I'm rocking my sweet NeoZ drysuit, I figured why not make some drygloves? Total cost was about $20. I may spend a little more and upgrade my liners, my hands got a little cold tonight, but the were dry!
DIY Dry Gloves and Rings.
DIY Dry gloves and ring are a fairly easy DIY project, requiring fairly few tools.
Step 1 – Acquire the necessary parts:
- 3” PVC coupling
- 4” diameter vacuum cleaner belts
- Rubber or Vinyl gloves
- Glove liners
- Contact cement
Step 2 – Mark the 3” PVC coupling and cut it in half. I used a 10” chop saw, but it could be done by hand if you’re careful.
Step 3 – I used a router to cut a grove, closer to one end. This will be where the vacuum cleaner belt will sit to hold everything together. This step can be done with a dremmel or just a file. I then sanded both pieces thoroughly to make sure that all surfaces were smooth so that nothing will snag on the latex seals on the suit.
Step 4 – Prepare the gloves. The inner surface of the gloves I bought was lined with some sort of fabric. Since this probably wouldn’t seal very well, I folded the gloves back on themselves, and applied a line of contact cement at the fold, and at the edge. Then fold the two together, to have the outside folded in permanently.
It’s a good idea at this point to make sure that every thing goes together. I assembled the gloves on the rings to make sure everything fits. Slide the glove over the ring, then slide the vacuum cleaner belt over the top to hold it in place.
Step 5 – Place the ring in the suit. The directions I was working from recommended going from inside the suit with the ring, but I found if worked better to just use a lot of talc and work the rings in from the open end. Make sure the end with the grove goes in towards the suit. I left mine so that the seal is still in place around my wrist. This way if the gloves leak the suit won’t flood.
Step 6 - Stretch the glove over the ring and latex seal. Then stretch the vacuum cleaner belts over the top of the gloves. You’re now ready to dive. Don the liner first, and put on the suit.
Step 7 – Go diving! Enjoy dexterity and dry hands!
I did wind up swapping out the awesome orange kitchen gloves that I originally tried, since they didn't have much room in them for thicker insulation, but even those kept me dry for the dive I did in them. I used exactly the same procedure and switched out to Smurf gloves. Right now the only thing I don't like is having them always attached to the suit makes dealing with my neck seal a PITA.
Tonights dive was 40 minutes, dry hands!
Jake

Re: DIY thread
Nwbrewer wrote:. Right now the only thing I don't like is having them always attached to the suit makes dealing with my neck seal a PITA.
Jake
Hey Jake when i used to work at a shop that was a DUI dealer customers that orderd zip seals on their suit complained about that too. Try to put your neck seal on first (only in self dawning) then put you arms in, works great and solves that problem. Cheers :occasion5:
Maverick
Diving. . . is an active physical form of meditation. It is so silent- You're like a thought.
SOME PEOPLE ARE LIKE SLINKIES. NOT REALLY GOOD FOR
ANYTHING, BUT THEY BRING A SMILE TO YOUR FACE WHEN PUSHED DOWN THE
STAIRS.
Diving. . . is an active physical form of meditation. It is so silent- You're like a thought.
SOME PEOPLE ARE LIKE SLINKIES. NOT REALLY GOOD FOR
ANYTHING, BUT THEY BRING A SMILE TO YOUR FACE WHEN PUSHED DOWN THE
STAIRS.
-
sheahanmcculla
- I've Got Gills
- Posts: 1387
- Joined: Wed Jun 13, 2007 11:54 am
Re: DIY thread
Nice Job! That's a great idea, I will have to try that at $20, for my suit. What kind of router bit did you use? I guess it doesn't matter as long as you get the groove. Also whats the average cost on the blue gloves??
Thanks
Sheahan
Thanks
Sheahan

Re: DIY thread
Nice Jake - I'll be making a set of those really soon here - I was thinking it, and you were doing it! Vacuum belts is the trick  Gotta go glove shopping.
Mike
Mike
Behold, the King reigns! You are his publicity agents. Therefore advertise, advertise, advertise, the King and his kingdom.

Re: DIY thread
Around $3.50 for single pairs of the unlined, $15 if you want them with liners (you don't...REI has better, warmer ones...) Get them here: http://www.seamar.com Atlas 660 is the model you're looking for.sheahanmcculla wrote:Also whats the average cost on the blue gloves??
There are no stupid questions, but there sure are a lot of inquisitive idiots...
Re: DIY thread
Yeah, I used 660's, but I overpaid, since I didn't feel like driving downtown. It was $6.00 for them at Mclendons. I think I may want to use the orange ones for the added dexterity, at the expense of some durability. They didn't have XL's when i was there.
Re: DIY thread
I've used both, actually - there's minimal flexibility differences between the two, really. The orange is supposedly double dipped in PVC, and the blue triple dipped. I usually get around 10 - 12 months from an orange pair, so for $3.50 a pair, who really cares?Nwbrewer wrote:I think I may want to use the orange ones for the added dexterity, at the expense of some durability. They didn't have XL's when i was there.
One other alternative is the Deep See gloves. They're a crushed neoprene glove that has a smooth rubber "cuff" inside which makes for great dry gloves and would seal up well. They're $35-ish online, or I know Matt carries them. Since they're neoprene, they're much warmer and much more durable, and I find them in a snug fit to be almost as dexterous as the smurf gloves. I think we've had this discussion on a separate thread around dry gloves.
There are no stupid questions, but there sure are a lot of inquisitive idiots...
Re: DIY thread
This is for all of you DIY gearheads. I found this link to an Oxycheq do it yourself light head. I knew they did a DIY oxygen analyzer but this is the first time I have seen this. Looks like a fun project.
http://www.oxycheq.com/download/DIY_Parts.pdf
http://www.oxycheq.com/download/DIY_Parts.pdf
Re: DIY thread
Here's a DIY with a twist. Fake scuba gear. My oldest daughter informed me that she wants to be a scuba diver for Halloween. Well it just wouldn't be right to do THIS one half-way! So I slipped off to the garage this afternoon for PHASE I. Here's the finished product. 18" tall made from black plastic drain pipe scrap, a pipe cap (tank boot), a coupler from the irrigation box, and an old tank valve from the scuba bone-pile. I used a propane torch to soften the end of the pipe and wearing welding gloves I reduced the end a bit at a time until I had a tank neck. Some filler/sanding, and a shot of plastic paint, and... TA DA. 
Edited to add: I think she likes it. She took it to bed with her tonight. ::happydad::
-Ben
-ps the backplate is done too, but the paint is still wet.
Edited to add: I think she likes it. She took it to bed with her tonight. ::happydad::
-Ben
-ps the backplate is done too, but the paint is still wet.
- Attachments
-
"The place looked like a washing machine full of Josh's carharts. I was not into it." --Sockmonkey
Re: DIY thread
NwBrewer:
What load is your reed switch capable of? 3amp? Are you running a luxeon LED so you don't go over those 3 AMPS?
Thanks,
D(B)
What load is your reed switch capable of? 3amp? Are you running a luxeon LED so you don't go over those 3 AMPS?
Thanks,
D(B)
Re: DIY thread
It's a 2 amp reed. It's a Seoul P4 3watt LED. Running at between .8 and 1.0 amps. I'm just direct driving it, so it varies with my battery charge. On fresh off the charger cells I get 1.0amp.
My new one is going to use a Seoul P7, which is a 2.8 amp LED, (still 3.7 volts though) so I'm going to have to figure out another plan. I'm thinking I'll use drivers on this one though, so I'm going to run 2 reed switches in parallel. Switch one on, 1.4amps, switch them both on, 2.8 amps. Gives me two levels of brightness, and makes it so I don't have to go out and buy a more complicated circuit.
If I could find the right sized relay I could just use the reed to switch the relay, but so far I haven't found one that would work at the voltage the I want. I could also run some type of MOSFET circuit, but my remedial EE knowledge is preventing that. Besides the more complicated you make it, the more there is to break.
Parts are ordered, should be here in a few weeks, I can't wait!
Let me know if you have any other questions.
Jake
oh, and Ben, that is AWESOME! Nice work!

Re: DIY thread
that's going to be one awesome costume, ben! send us more pics when it's done.airsix wrote:Here's a DIY with a twist. Fake scuba gear.
...
Edited to add: I think she likes it. She took it to bed with her tonight. ::happydad::
oh, and you really need to get back in the water soon, my friend...

Re: DIY thread
Thanks! That was why I asked. I was looking at a 3-4Amp light, and a reed switch, and that's pushing it.
Now having two reed switches, but only one on, couldn't that burn out the switch [as the switch has a near similar configuration to a fuse]? My understanding is that if the light wants to draw 4 amps, it will begin to overheat the reed switch, as it can't carry that much. Having two works, but they would both have to be on the whole time. Maybe I'm thinking about it the wrong way.
I was looking at a relay/Mosfet option, but I'm in the same boat as you. I want it more simple.
The Reed switch will work with the Luxeon LED's because they draw at max around 700mA, so I may just stick with that.
Once again, thanks for your response!
D(B)
Re: DIY thread
That's why I'm using drivers. Each driver draws 1.4 amps, and that's it. So the limit for each switch is 1.4amps. If you're direct driving the LED, you're right, it draws the current it's rated for at a given voltage.
Don't use Luxeons unless you're getting them cheap. You're better off with the Cree XR-E's or Seoul P4's, much more light for the given amperage. What kind of configuration are you shooting for? A 3 or 4 LED lighthead? The only issue with those is it's hard to get that nice laser beam effect that's so nice for the PNW. That's why I'm going for the P7. Hopefully get better throw, just using the maglite reflector.
Let me know if you need any advice on where to source stuff, I've found some cheap sites for components. I also will have some extra drivers (had to buy 10) so I may be willing to let some go.
Jake
Re: DIY thread
hey defied, have you thought about using one of these?
http://www.taskled.com/techd2dim.html
only $20.
http://www.taskled.com/techd2dim.html
only $20.
Re: DIY thread
Are those the drivers you picked up? I'll buy one or two off of you to play with.Nwbrewer wrote:hey defied, have you thought about using one of these?
http://www.taskled.com/techd2dim.html
only $20.
I'm looking at a three LED config with the Luxeon's. Not sure if I decide to go with a diff LED.
For the Luxeon's, I was eyeballing this driver:
http://www.luxeonstar.com/powerpuck-700 ... s-p-27.php
It's pretty nice, and self contained. The driver you have, I'd have to get an inline resistor (allthough that's not even close to hard work), but it looks like it's more configurable. I'd like to mess around with it. I'll probably wrap the focus with a fresnel lens, that way it doesn't matter the light type, I can bend the beam in either direction with the fresnel.
D(B)
Re: DIY thread
Thanks, Matt & Loretta. I'll post a Halloween-night picture of the whole gang.
-Ben
-Ben
"The place looked like a washing machine full of Josh's carharts. I was not into it." --Sockmonkey