DIY thread

Need advice on recreational gear configurations? Look no further than this equipment forum.
Post Reply
User avatar
Nwbrewer
I've Got Gills
Posts: 4623
Joined: Fri Jul 21, 2006 10:59 am

Re: DIY thread

Post by Nwbrewer »

defied wrote:
Nwbrewer wrote:hey defied, have you thought about using one of these?

http://www.taskled.com/techd2dim.html

only $20.
Are those the drivers you picked up? I'll buy one or two off of you to play with.

I'm looking at a three LED config with the Luxeon's. Not sure if I decide to go with a diff LED.

For the Luxeon's, I was eyeballing this driver:

http://www.luxeonstar.com/powerpuck-700 ... s-p-27.php

It's pretty nice, and self contained. The driver you have, I'd have to get an inline resistor (all though that's not even close to hard work), but it looks like it's more configurable. I'd like to mess around with it. I'll probably wrap the focus with a fresnel lens, that way it doesn't matter the light type, I can bend the beam in either direction with the fresnel.

D(B)

No, I got 1.4amp linear current regulators from deal extreme. The D2DIMM isn't a regulator, it's a dimmer, you still need a current regulator.

Those puck regulators are good, H2ODoc uses one from LEDsupply (probably the same one) You can use that one with Cree XR-E's or Seoul P4s with no problems. If you're look at running a bunch of 3watt LED's in series though, why not just go to the MC-E? Use that same 700ma driver with 14.4 volts of Ni-Mh batteries? Or you can use 4 Lithiums in series. It will also allow you to focus it better for more throw.

I wouldn't use Luxeons unless you're getting them for free or something. The Cree's and Seoul's are virtually the same from a size/focusing/power consumption perspective, but will give you more light.

What host are you going to use?

Jake
defied
I've Got Gills
Posts: 2057
Joined: Wed Sep 17, 2008 8:14 pm

Re: DIY thread

Post by defied »

Wow, thanks. I'll take a look at those.

I'm sorry, what do you mean by host?
User avatar
Nwbrewer
I've Got Gills
Posts: 4623
Joined: Fri Jul 21, 2006 10:59 am

Re: DIY thread

Post by Nwbrewer »

Are you machining a lighthead, building one from PVC, Maglite?
defied
I've Got Gills
Posts: 2057
Joined: Wed Sep 17, 2008 8:14 pm

Re: DIY thread

Post by defied »

Probably building one from PVC for the prototype, and then hopefully machining one out of Delrin.
User avatar
Nwbrewer
I've Got Gills
Posts: 4623
Joined: Fri Jul 21, 2006 10:59 am

Re: DIY thread

Post by Nwbrewer »

Cool. Beware, LED's generate a bit of heat, and you have to get rid of it somewhere. It's not like burn yourself hot, but it's enough heat to damage the emitters. Most LED lightheads are made fo aluminum for that reason. Other than copper, they have the highest thermal conductivity of any metal you can easily lay hands on and machine. Heat is conducted from the LED, to the heatsink, to the lighthead, out to the water or air. Maglite make really suitable hosts for this reason.
User avatar
airsix
I've Got Gills
Posts: 3049
Joined: Mon Jan 22, 2007 7:38 pm

Re: DIY thread

Post by airsix »

And don't forget, LED light output drops as temperature rises.
"The place looked like a washing machine full of Josh's carharts. I was not into it." --Sockmonkey
defied
I've Got Gills
Posts: 2057
Joined: Wed Sep 17, 2008 8:14 pm

Re: DIY thread

Post by defied »

airsix wrote:And don't forget, LED light output drops as temperature rises.
Yeah, that's why I'd have a heat sink in place.

Milling the head out of aluminum would be good for that, as you can source the heat directly to water.
User avatar
Nwbrewer
I've Got Gills
Posts: 4623
Joined: Fri Jul 21, 2006 10:59 am

Re: DIY thread

Post by Nwbrewer »

defied wrote:
airsix wrote:And don't forget, LED light output drops as temperature rises.
Yeah, that's why I'd have a heat sink in place.

Milling the head out of aluminum would be good for that, as you can source the heat directly to water.
The heatsink has to be exposed to the elements somehow. I don't think you're gonna have a lot of luck with the heatsink encased in delrin at 700ma with three emitters....
User avatar
smike
Extreme Diving Machine
Posts: 407
Joined: Wed Dec 26, 2007 3:23 pm

Re: DIY thread

Post by smike »

That's why I'm making an aluminum light head and a PVC battery case / regulator / switch. The light head is surprisingly complicated with the light and the waterproof cabling attachment, though.
Behold, the King reigns! You are his publicity agents. Therefore advertise, advertise, advertise, the King and his kingdom.
defied
I've Got Gills
Posts: 2057
Joined: Wed Sep 17, 2008 8:14 pm

Re: DIY thread

Post by defied »

That's true. Maybe I'll mill the head out of aluminum.
defied
I've Got Gills
Posts: 2057
Joined: Wed Sep 17, 2008 8:14 pm

Re: DIY thread

Post by defied »

nwbrewer, that P7 is dirty hot. Do you have a source for them for a decent price? I haven't looked too far, but the first deal I came across was $30.00

D(B)
User avatar
Nwbrewer
I've Got Gills
Posts: 4623
Joined: Fri Jul 21, 2006 10:59 am

Re: DIY thread

Post by Nwbrewer »

That's what I paid for mine. About the same as putting 4 smaller LED's in one head, but it's easier to wire and you ca focus it down tighter.

I Paid $40 for a D-bin (make sure whichever ine you get it's either a D-bin or C-bin) and a custom machined and anodized heatsink for a D-cell maglite. I bought it off one of the custom guys on candlepower forums. PM sent with that info.

Jake
defied
I've Got Gills
Posts: 2057
Joined: Wed Sep 17, 2008 8:14 pm

Re: DIY thread

Post by defied »

Got it!, thanks!
User avatar
Nwbrewer
I've Got Gills
Posts: 4623
Joined: Fri Jul 21, 2006 10:59 am

DIY Thread PT/Scout/UK upgrade

Post by Nwbrewer »

As promised, here's the upgrade to the PT LED. I purchased a Drop in module for a surefire light with a Cree Q5 in it. (Really bright efficient LED). It came in the mail today, and I promptly tore it apart and stuffed it into my second hand Photon Torpedo. The same should work for anyone with a Scout, or UK SL4/SL6.

Here's the module I bought, (~$13)
Image

The reflector threads onto the LED module, so it's actually somewhat focusable which is nice.

It's the same length as the original UK drop in that was in the PT, but it's quite a bit smaller in diameter.
Image
Image

So I took a piece of old Maglite I had laying around, and cut a ring out of it, then squished it and wrapped it with metal tape to get the right diameter. Make sure it's the same height as the old drop in's upper ring, or this won't work.
Image
Image

After that, flip the batteries in your light (the center post on the drop in is (+), opposite of the orignial) and screw the head on. Mine actually seats better with the drop in than it used to with the original. about 1/4 twist from bottoming out the light comes on.

I compared it with the Maglite brand drop in that I have in my old pelican backup, and with the original UK drop in it came with -
Image

I like it. This is a really quick and easy (and Cheap!) way for people running halogen bulbs to upgrade, or people who just want a little more brightness out of their LED lights.

Here's the drop in I bought, cheap, but it took a while to get here -

http://www.dealextreme.com/details.dx/sku.11621

Since I was in the mood (and I fried my primary the other day :pale: ) I mad a quick soft goodman handle for it. Gonna dive it tomorrow!

Image

Jake
defied
I've Got Gills
Posts: 2057
Joined: Wed Sep 17, 2008 8:14 pm

Re: DIY thread

Post by defied »

Jake,
That's awesome, and a great idea! I'm going to grab one of those lights, and build a soft goodman for it, while I'm slowly collecting parts to make a can.

Awesome!
D(B)
User avatar
Alex
Aquaphile
Posts: 114
Joined: Thu Aug 28, 2008 8:50 pm

Re: DIY thread

Post by Alex »

Jake! you guys just let me know when you're done with your lights I'll come test them

http://www.youtube.com/watch?v=z57gRIY_QCc
User avatar
Nwbrewer
I've Got Gills
Posts: 4623
Joined: Fri Jul 21, 2006 10:59 am

Re: DIY thread

Post by Nwbrewer »

Mine bounced off the concrete after I left it on teh tailgate the other day, does that count? The main complaint about Solus lights is that they are very diffuse, it's a multi-emmiter lighthead, the beam won't stay as tight as what you'd want for signaling. There's a guy on some of the other boards who built a multi emmitter who uses aspheric optics to Keep the beam really tight, and makes a singe focal point, but there's virtually no spill (think laser pointer.)

Jake
User avatar
H20doctor
I've Got Gills
Posts: 4225
Joined: Fri Apr 18, 2008 12:13 pm

Re: DIY thread

Post by H20doctor »

Hmmmmmmm. All this modding dive lights is making me want to build one..! Oh wait I do build them .. :smt038
NWDC Rule #2 Pictures Or it didn't Happen
defied
I've Got Gills
Posts: 2057
Joined: Wed Sep 17, 2008 8:14 pm

Re: DIY thread

Post by defied »

H20doctor wrote:Hmmmmmmm. All this modding dive lights is making me want to build one..! Oh wait I do build them .. :smt038
#-o
User avatar
airsix
I've Got Gills
Posts: 3049
Joined: Mon Jan 22, 2007 7:38 pm

Re: DIY thread

Post by airsix »

Most of us here share quite a bit in common, and frequently one of those things is a mentor. Over the past several years two people have really come to stand out in my mind in this regard. They’ve both given of their own time and talent to help me personally, and I’ve seen them help dozens of others as well. In fact, when I make a list of my favorite people to dive with, most of them have been mentored or trained by one of these two wonderful people. So I want to turn the spotlight on Bob (grateful diver) and Lynne (LCF). Thank you both for your spirit of giving and sharing. What do they have to do with the DIY thread? Well, I just finished a little DIY project, and if things went according to plan a little something showed up in their mailboxes today. Months ago Sounder pieced together the clues and figured out what I was doing. Since that time he's been my motivator, pushing me to finish this project, so one of these is in his mailbox as well. Thanks Doug. It would probably only be half finished if it weren't for your friendly nudges. Penelope actually got one before any of you. She stood in line at Underwater Sports for hours to pick up some new tanks for me at their sale this year. Thanks, P! You're an awesome friend!

OK, here are the project photos straight from Santa’s workshop…

My interpretation of "how to make a dive knife":

Step 1: Find the right alloy. I chose this one. It rocks. I don't think there's a better alloy for this application anywhere.

Step 2: Get the French manufacturer to send some. They wouldn’t take my money. They wanted a knife instead. Turns out most of them are divers. They got the first prototype.
Image

Step 3: Figure out what this thing’s going to look like. Here are a few of the various design drawings.
Image

Step 4: Transfer the pattern to steel and rough-cut on the metal bandsaw.
Image

Step 5: Clean up on the belt-grinder (which was another DIY project), and drill some holes.
Image

Step 6: Heat treat. Bad things happen when you mix high-alloy stainless steels with heat and oxygen. So, the blades go into an air-tight sacrificial stainless-steel foil envelope. Be careful, stainless foil is sharp.
Image

Step 7: Into the heat treat furnace (which was another DIY project). This alloy gets a timed soak at 1,922 Fahrenheit (temp controller reads in Celsius).
Image

Step 8: The foil packet gets pulled from the furnace and quenched to room-temp. This has to be done quickly. It goes from 1,900 degrees to room temp in about 40 seconds.
Image

Step 9: Some high-alloy stainless steels are stubborn, not reaching full hardness without a cryogenic treatment following the quench to room-temp. This steel is one of those, and so at this point it goes into the liquid nitrogen (-321F) for 2 hours.
Image

Step 10: Blade gets tempered twice at 356 degrees Fahrenheit. Tempering will relieve the stresses created by hardening. Then it gets cleaned up and the main bevels ground on the belt grinder.
Image

Step 11: Time to put handles on this thing. Sure looks ugly, doesn’t it! The handles (scales) are micarta, which is canvas laminated with epoxy. It’s like fiberglass, but made with cotton instead of glass fiber. Don’t worry, it’ll look better soon. Scales are applied with 10-ton epoxy, brass pins and clamped up.
Image
Image

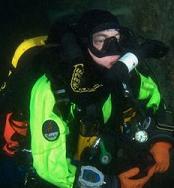
Step 12: Tape off the blade and grind away the excess handle material. Shape the handle, sand, sand ,sand, sand, and polish. Ta Da. There it is. 80% more corrosion resistant than 440c, harder than beta-alloy titanium, and a nice stout 4mm thick spine. I think I’ll call it the Orca, because it’s ready to take on anything in Puget Sound.
Image
Image

Step 13: Need a secure way to carry it. Sheath is kydex. Knife snaps into the sheath for possitive retention, but a 1/8" bungee loop stretched over the sheath gives a little extra security and doubles as a wrist-strap. Working kydex is pretty easy. Cut it with a saw, heat it, mold it to shape, buff the edges, and that's about it.
Image
"The place looked like a washing machine full of Josh's carharts. I was not into it." --Sockmonkey
User avatar
Joshua Smith
I've Got Gills
Posts: 10250
Joined: Mon Apr 03, 2006 9:32 pm

Re: DIY thread

Post by Joshua Smith »

:smt119


Ben, you are a real piece of work. And so are those knives. I'm quite impressed. Those look like *awesome* knives. And the whole idea that you'd do something like that as a thank you gift for people.....well, heck. That's pretty darn touching.
Maritime Documentation Society

"To venture into the terrible loneliness, one must have something greater than greed. Love. One needs love for life, for intrigue, for mystery."
User avatar
camerone
Submariner
Posts: 517
Joined: Mon Jan 07, 2008 7:58 pm

Re: DIY thread

Post by camerone »

Awesome. That is serious art and craftsmanship.
airsix wrote: Step 1: Find the right alloy. I chose this one. It rocks. I don't think there's a better alloy for this application anywhere.
For my own curiosity:

How much of a PITA is this material to machine? Does it work harden like 316L? Does it machine up like 316 or 304?

What'd you use to emboss the knurling on the handles?
There are no stupid questions, but there sure are a lot of inquisitive idiots...
User avatar
spatman
I've Got Gills
Posts: 10881
Joined: Wed May 30, 2007 7:06 am

Re: DIY thread

Post by spatman »

wow, ben! just... WOW! :supz: =D> :salute:

so do your talents actually have limits?


and where mine at? :evil4:
Image
User avatar
Pez7378
I've Got Gills
Posts: 3256
Joined: Wed Jun 21, 2006 11:09 am

Re: DIY thread

Post by Pez7378 »

I bet if you could design and build a Karambit out of that alloy, I could find a market. That is a sweet piece of work Ben. =D>
User avatar
Nwbrewer
I've Got Gills
Posts: 4623
Joined: Fri Jul 21, 2006 10:59 am

Re: DIY thread

Post by Nwbrewer »

Ben, those are works of art. Truly awesome. :notworthy: :notworthy: :notworthy:
Post Reply